https://drive.google.com/file/d/1okuuw9aQxMKnCC0t-Zxz3HtkJL9uZe4H/view?usp=drivesdk
Tuesday, 29 April 2025
Monday, 28 April 2025


Tuesday, 22 April 2025


Monday, 21 April 2025
Adobe Illustrator Grids and Guidelines
Adobe Illustrator Grids and Guidelines
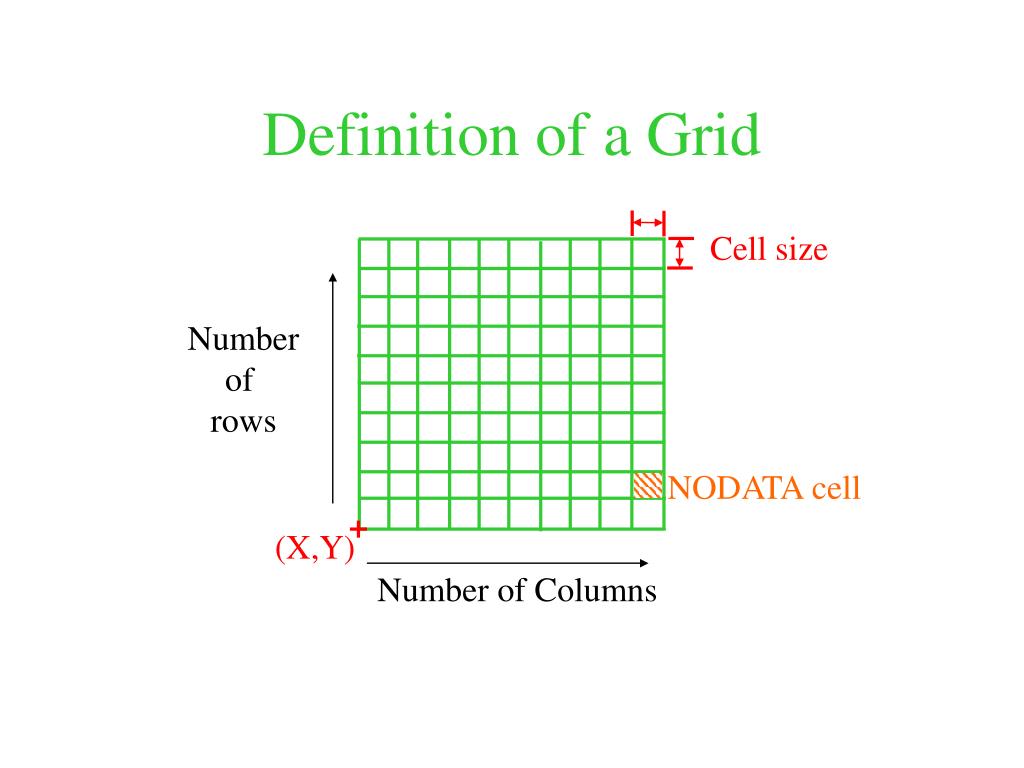
What is mean by Grids?
A grid is a framework of evenly spaced horizontal and vertical lines that intersect to form squares or rectangles
How to Open Grids in Adobe Illustrator?
- Open "View" in menu bar and Select "Show Grids"
- Ctrl + " to open the grids

How to Control the Grids?
- Open "Eidt" in the menu bar and go to the "Reference" the Click "Grids"
- Ctrl + K

Utilizing grid controls in Adobe Illustrator allows precise adjustments to size, color, and various design modifications, ensuring structured and dynamic compositions.

Why the Grids?
To place the proper alignment and placement of the objects.
How to place the object exact to the grids?

- Go to "View" in menu bar and Select "Snap to Grid"
- Ctrl + Shift + "
How to move the Canvas?
- "Ctrl + H" for Hand Tool
- In Selection method Select the object and press "Space" button Hold and Drag
How to Lock the Object?
- Go to "Object" in menu bar and Select "Lock"
- "Ctrl + 2" to Lock the object
- "Ctrl + Shift + 2" for unlock
Properties of Line or Stroke?
In Adobe Illustrator, the term "stroke" refers to the outline or border of a shape, path, or text. You can modify the stroke's color, thickness, style, and opacity to enhance your design. Illustrator allows you to apply dashed lines, variable widths, and brush effects to strokes, making them more dynamic.
To open Stroke press "Shift + F10"

Thickness of Line is "Weight of Line"
Profile predefined design Styles. By default, it's Uniform

Hit the "D" for default to natural line or original size of the line.
Dashed Line to create "-- -- -- " those types of lines, we can give the gaps and dash length. Arrowheads:

- To change the direction of the arrow
- To change the thickness of the arrow
- Style change
- Placement of the arrow
- Alignment of the arrow
Caps: the edge of the line is called "Caps"
- Bottom cap
- Rounded cap
- Projected cap
How to show multiple Stroke in single line?
Using Appearance window, we can show multiple lines in single line

To open Appearance "Go to window in menu bar and Select Appearance"
How to Save the Style?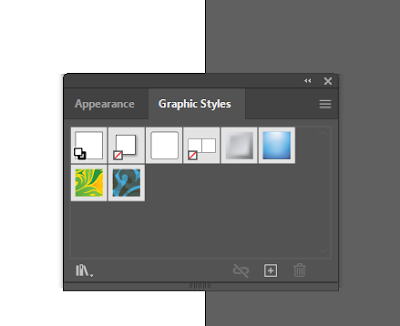

GO to window in menu bar and open Graphic Styles then click this button "+". It will save.
"Click Shift + f5" to open Graphic Styles
Break the line: to break the line into multiple part and change properties
- Scissor "C" enter
- Click first and click next point then it will break.


Cut the selected anchor point to cut the anchor or edge points of the object.
Saturday, 19 April 2025
Ai final presentation
How make a Final Presentation in Adobe illustrator
Final Presentation in Adobe illustrator
Presentation Process:
Open Adobe Illustrator and set the document size to A4.
Extend the margins by 1 inch on all sides.
Place the input details on the left side of the paper.
Add the name, brand, and specifications in the bottom-right corner.
Save the file after completing the design.
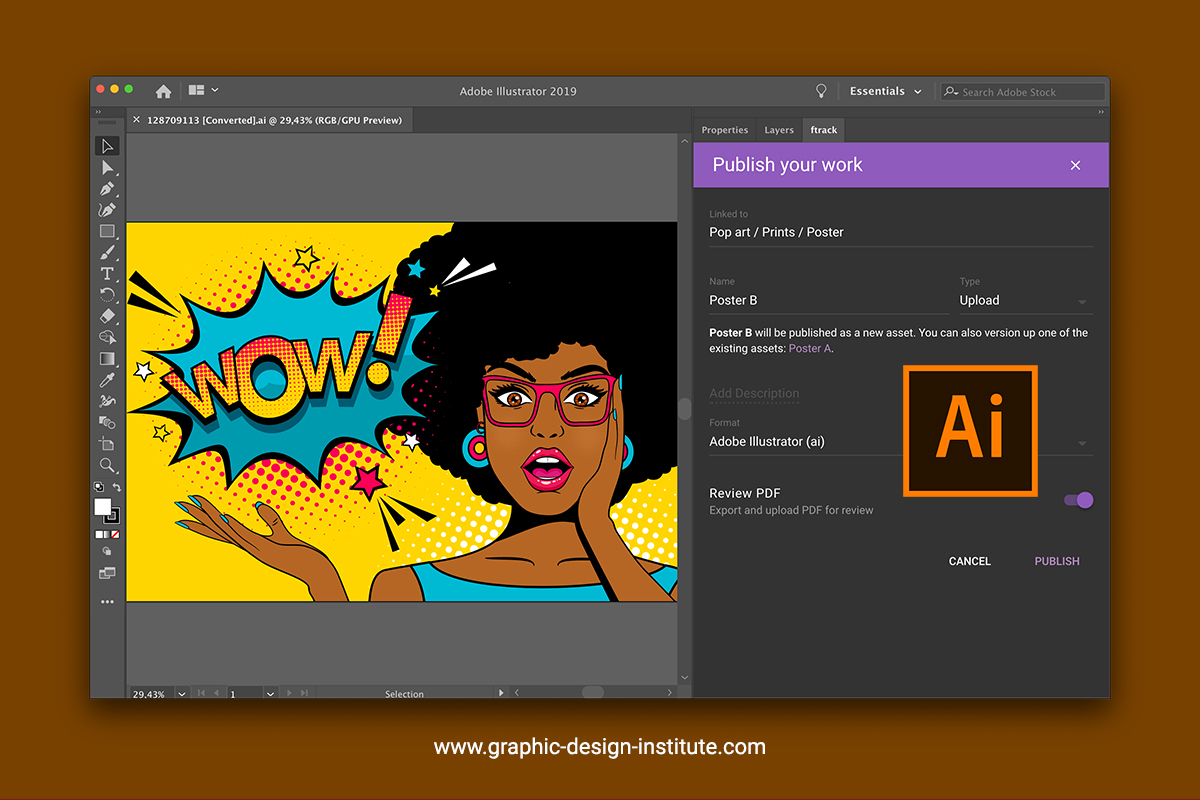
How to Save the Document in Adobe Illustrator:
There are Two Types:
- Save
- Export
Save:
Ctrl + S to the Fille in ".ai" formatIts help to modify the fille and not open customer.
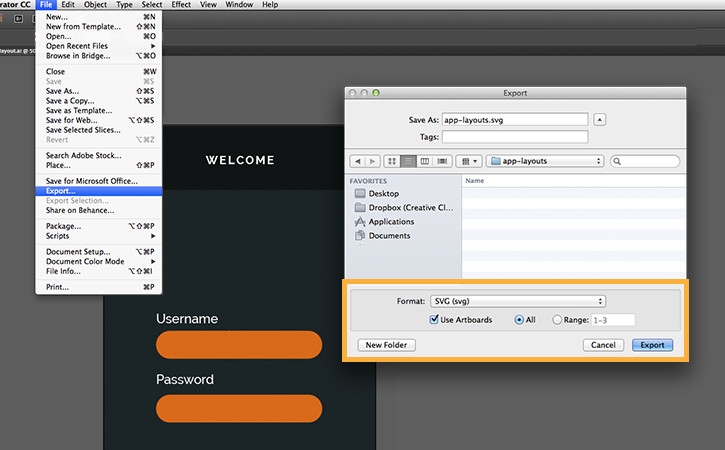

The Export method to export the fille number of formats:
- .jpeg
- .png
- .tiff
- .psd
.JPEG: This is called the Joint Photographic Experts Group (JPEG) format. It compresses files while maintaining high quality, requiring less data storage. As a result, images upload quickly.
.PNG: This is called Portable Network Graphics (PNG). This file format supports transparency.
.TIFF: TIFF stands for Tagged Image File Format. It is commonly used for high-quality printing but requires more data storage due to its large file size.
.PSD: The Photoshop Document (PSD) format is a raster-based file type used in Adobe Photoshop. It supports multiple layers, vector elements, transparency, shapes, and other image data, allowing users to save and edit several design components within a single file.
Alignment Methos based on Reference Points:
- Default it aligned with canvas
- Selection Method
- Key Object Method
Key Objects:
Main object or Targeted object is called "Key Object"
- Select the object, to click double tap it will show "dark color"
Anchor point and Reference point
In Adobe Illustrator, reference points and anchor points serve distinct but related roles in manipulating objects. Here's a breakdown of their differences:
Anchor Points:
* Definition: Anchor points are the fundamental building blocks of vector paths and shapes. They are the points that define the curves and corners of an object. Think of them as the "joints" that connect line segments.
* Function:
* They determine the shape of a path or object. By moving anchor points and their associated direction handles (for curved paths), you can reshape the artwork.
* They are essential for editing paths using tools like the Direct Selection tool (A), Pen tool (P), and Anchor Point tool (Shift+C).
* You can add, delete, and convert anchor points to modify the complexity and form of an object.
* Visibility: Anchor points are visible when a path or shape is selected with the Direct Selection tool or when you are actively drawing or editing with path-related tools. They appear as small squares.
Reference Point:
* Definition: The reference point is a specific point on an object that serves as the origin for transformations such as scaling, rotating, and reflecting.
* Function:
* When you perform a transformation, the object changes relative to the selected reference point.
* Illustrator provides nine default reference points: the center, the four corners, and the midpoints of the sides of the object's bounding box.
* You can usually select the desired reference point in the Control panel or the Transform panel before applying a transformation.
* For example, if you scale an object using the top-left reference point, the top-left corner will remain in the same position while the rest of the object scales away from it.
* Visibility: The reference point is typically indicated by a small icon (often a 3x3 grid of squares with one highlighted) in the Control panel or the Transform panel when an object is selected and a transformation tool is active. It's not directly visible on the artboard like anchor points.
Here's an analogy to help visualize the difference:
Imagine you have a rubber band stretched between several thumbtacks on a board.
* Anchor points are like the thumbtacks. They are fixed points that define the shape of the rubber band. By moving the thumbtacks, you change the rubber band's shape.
* The reference point is like choosing one specific thumbtack as the point around which you stretch or rotate the entire rubber band configuration.
In summary:
* Anchor points define the structure and shape of vector objects. You directly manipulate them to edit the form.
* Reference points define the origin for transformations. They determine the point from which scaling, rotation, and reflection occur.
Understanding the distinction between these two concepts is crucial for precise control when creating and editing artwork in Adobe Illustrator.
Tracing can mean different things, such as copying a drawing, determining crime scene activity, or following the development of something.
Thursday, 17 April 2025
Ai Line Tool
Adobe Illustrator Line Tool
Line Tool
User Interface:


What Is Control Pannal?
This is the place were Activity Tools customized.
What is Tool Bar?


Tool bar is left side in the screen.
Types of Tool Bar:
- Single Column
- Double Columns
Parts of Tool Bar:
- Solution Part
- Creative Part
- Modifications Part
- Bindings Part (Mixing purpose)
- Graphic Tool
- Help
Line Tool:
- To Select " \ " to draw a line
- Closure type "+"
- Click, Drag and Leave to make line
- When Click is Start point, drag with length and Direction and leave confirmation.
Tips and Tricks:
- "Shift + Drag" to crate 45 degrees angle line
- "Alt + Drag" to draw Symmetrical line (center point to equal to both sides)
- "Alt + Shift + Drag" 45 degrees symmetrical line
- "` " to create a multiple line (Click"`" + drag+ hold "`"+leave Closure)
- Measurements: to take line tool click on worksheet then pop up will be open then give length and degree
- Increase or decrease the line "Select the line and go to control panel chosen "Transpose" feed +/-
- "Tab" click then tool bar will be hide
- "F" clicks on time to hide "Titel bar" for Two times to hide "Menu bar" If three time open all bars.
- Ctrl + "+" Zoom in
- Ctrl + "-" Zoom Out
- Ctrl + "0" normal size (Window fit)
- "H" for Head tool bars to move document
- Hold "Space button" to active hand "Temporary"
How to Change Unite System:
- Go to "View menu" and Select "Ruler" give right click on the rulers "Ctrl + R "
Creating Tools:
- Open Shape
- Close Shape
Open Shape:
- Line = "\"
- Pen = "P"
- Pencil = "N"
- Brush = " B"
Close Shape:
- Basic Shape
- Polygon Shape
- Customize Shape (User defined shape)
Basic Shape:
- Rectangle
- Ellipse
Selection Tool:
- Direct Select = To click "A"
- Normal Select = To click "V"
Ai (Transfer object)
Working with Adobe Illustrator
Transform Objects

You can use the Transform panel to view the locations, sizes, and orientations of one or more selected objects. Type new values to modify the selected objects and their pattern fills, or both.
The purpose of Transform is:
- Move the Object
- Rotate the Object
- Scales the Object
Processes For Create a Design:
Select the Line: Three are two Types
- Part of the Object = (Short Key is "A")
- Full Selection of Object = (Short Key "V")
Stoke:
Use the Stroke panel (Window > Stroke) to specify whether a line is solid or dashed, the dash sequence and other dash adjustments if it is dashed, the stroke weight, the stroke alignment, the miter limit, arrowheads, width profiles, and the styles of line joins and line caps.

How to Duplicate the Object:
There are 5 methods:
- "Ctrl + "C" and "Ctrl + "V" copy and past
- Alt + Drag
- "Ctrl + C" and Ctrl + F in front of the object
- Select the object and press "Enter" a pop up will be open then fill the information.
- First "Ctrl + D " will be done First, then go to "Transform" Select Transform again then press it.
Layers:
Press F7 open Layers
Benefits of the Layers:
.png.img.png)
- Hide the Object
- Lock the Object
- Select the object with one Click
- Create multi layers
- Ordering the object
- Reference Points
- "Ctrl + D" and Ctrl + F
- Shift + drag get 45-degree accuracy
How to move line with measurement:
Go to Transform menu on Control panel "Shift + 8"
Tuesday, 15 April 2025
Ai Menu Bar
The Adobe Illustrator menu bar is located at the very top of the application window (on macOS, it might appear at the top of the screen). It provides access to a wide range of commands and functions organized into several drop-down menus. Here's a breakdown of the common menus you'll find:
Common Menu Items in Adobe Illustrator:
* File: This menu typically contains commands related to file management, such as:
* New: Creates a new document.
* Open: Opens an existing Illustrator file or other compatible formats.
* Close: Closes the current document.
* Save: Saves the current document.
* Save As: Saves a copy of the current document with a new name or format.
* Save a Copy: Saves a duplicate of the current file.
* Export: Saves artwork in various formats (e.g., JPEG, PNG, SVG, PDF).
* Place: Imports external files (images, other Illustrator files, etc.) into the current document.
* Print: Prints the current document.
* Document Setup: Allows you to modify document settings like artboard size, units, bleed, etc.
* Exit (or Quit on macOS): Closes the Adobe Illustrator application.
* Edit: This menu contains commands for modifying your artwork:
* Undo: Reverses the last action.
* Redo: Reapplies the last undone action.
* Cut: Removes selected artwork and copies it to the clipboard.
* Copy: Copies selected artwork to the clipboard.
* Paste: Inserts artwork from the clipboard.
* Paste in Front: Pastes artwork directly in front of the selected object(s).
* Paste in Back: Pastes artwork directly behind the selected object(s).
* Paste in Place: Pastes artwork in the exact same position it was copied from.
* Clear: Deletes selected artwork.
* Select: Provides various options for selecting artwork (e.g., All, Deselect, Inverse, Same Appearance).
* Find and Replace: Allows you to search for and replace specific attributes or text.
* Edit in [Another Adobe Application]: Opens the selected artwork in a linked Adobe application (if installed).
* Preferences: Opens the Illustrator Preferences dialog box, where you can customize various application settings.
* Object: This menu contains commands for manipulating objects:
* Transform: Includes options for moving, scaling, rotating, reflecting, and shearing objects.
* Arrange: Controls the stacking order of objects (e.g., Bring to Front, Send to Back).
* Group: Combines selected objects into a single group.
* Ungroup: Separates a selected group into individual objects.
* Lock: Prevents selected objects from being edited.
* Unlock: Allows locked objects to be edited.
* Hide: Makes selected objects invisible.
* Show All: Makes all hidden objects visible.
* Path: Provides tools for manipulating paths (e.g., Join, Average, Offset Path).
* Offset Path: Creates a new path offset by a specified distance from the original.
* Outline Stroke: Converts strokes into filled paths.
* Expand: Converts basic shapes or strokes into editable paths or fills.
* Gradient Mesh: Creates complex color blends within an object.
* Pattern: Options for creating and editing patterns.
* Blend: Creates a series of intermediate shapes between two or more objects.
* Live Trace (Image Trace): Converts raster images into vector paths.
* Rasterize: Converts vector artwork into a raster image.
* Create Clipping Mask: Uses one object to mask the visibility of others.
* Compound Path: Creates holes in overlapping paths.
* Type: This menu contains commands for working with text:
* Font: Lists available fonts.
* Size: Sets the font size.
* Glyphs: Opens the Glyphs panel to access special characters.
* Create Outlines: Converts text into editable vector paths.
* Type on a Path: Allows you to create text that flows along a path.
* Area Type Options: Sets options for text within a closed path.
* Threaded Text: Links text frames so that text flows between them.
* Find Font: Helps you locate and replace specific fonts in your document.
* Select: This menu provides various ways to select artwork:
* All: Selects all objects on the active artboard.
* Deselect: Clears the current selection.
* Inverse: Selects all objects that are not currently selected.
* Same: Allows you to select objects with the same attributes (e.g., Fill Color, Stroke Weight).
* Object: Provides options for selecting specific types of objects (e.g., All Artboards, Stray Points).
* Save Selection: Saves the current selection for later use.
* Load Selection: Loads a previously saved selection.
* Effect: This menu contains a wide range of raster and vector effects that can be applied to artwork:
* Distort & Transform: Includes effects like Roughen, Pucker & Bloat, Twist, and Free Distort.
* Stylize: Offers effects like Drop Shadow, Feather, and Rounded Corners.
* Path: Includes path manipulation effects like Offset Path and Outline Object.
* Pathfinder: Provides tools for combining and dividing objects (though often accessed via the Pathfinder panel).
* Raster Effects: Contains Photoshop-style raster effects (e.g., Gaussian Blur, Sharpen).
* 3D and Materials: Allows you to create and manipulate 3D objects.
* SVG Filters: Applies Scalable Vector Graphics filters.
* Warp: Offers various warping effects like Arc, Bulge, and Wave.
* View: This menu controls how you view your artwork and the Illustrator interface:
* Zoom In: Enlarges the view.
* Zoom Out: Reduces the view.
* Fit Artboard in Window: Zooms to show the entire active artboard.
* Fit All in Window: Zooms to show all artboards.
* Actual Size: Displays the artwork at 100% zoom.
* Overprint Preview: Simulates how colors will look when printed with overprinting.
* Pixel Preview: Shows how vector artwork will render on a pixel grid.
* Guides: Options for showing, hiding, creating, and managing guides.
* Rulers: Toggles the display of rulers along the top and left edges of the document window.
* Show/Hide Grid: Toggles the display of the document grid.
* Snap to Point/Grid/Pixel: Controls whether objects snap to specific points, the grid, or pixels when moved or drawn.
* Show/Hide Transparency Grid: Displays a checkered background to indicate transparency.
* Proof Setup/Colors: Options for color proofing.
* Window: This menu provides access to all the panels available in Illustrator:
* Lists all the individual panels (e.g., Color, Swatches, Layers, Appearance, Graphic Styles, Align, Pathfinder, Transform, Type, Stroke, Gradient, Transparency, Symbols, Brushes, etc.). Selecting a panel name will open or bring it to the front.
* Workspace: Allows you to choose from predefined workspace layouts or save your own custom layouts.
* Actions: Opens the Actions panel for recording and playing back sequences of steps.
* Links: Opens the Links panel to manage placed external files.
* Document Info: Displays information about the current document.
* GPU Performance: Shows information about your computer's GPU usage.
* Help: This menu provides access to documentation, tutorials, and support resources:
* Illustrator Help: Opens the Adobe Illustrator Help documentation.
* Adobe Support: Links to the Adobe support website.
* Illustrator Tutorials: Provides links to online tutorials.
* What's New in Illustrator: Highlights new features in the current version.
* About Illustrator: Displays the application's version information and copyright details.
Customization:
While the main menu bar itself cannot be significantly customized in terms of which items are present, you can customize other aspects of the Illustrator interface that are accessed through the "Window" menu, such as:
* Workspaces: You can arrange, open, and close panels and tools, and then save your preferred layout as a custom workspace.
* Toolbars: You can customize which tools appear in the main toolbar. In newer versions, you can often switch between a Basic and an Advanced toolbar. You can also create custom toolbars.
* Keyboard Shortcuts: You can customize keyboard shortcuts for many menu commands and tools to speed up your workflow.
Understanding the functions within each menu of the Adobe Illustrator menu bar is crucial for effectively using the software and accessing its powerful features.

.png)

.png)
.png)
.png)
.png)
.png)
.png)
.jpeg)
.png)
.jpeg)
.png)
.jpeg)
Principal of graphic design
Principles of Graphic Design
What Is Graphic Design?
Graphic design is the art and practice of creating visual content to communicate messages or ideas. It combines elements like typography, imagery, color, layout, and space to create designs that are not only aesthetically pleasing but also effective in delivering a specific message or solving a problem.

Levels of Logos.
- Basic Level (Simple Logos, Like Circles, Rectangles)
- Text Logos (Name as a Logo)
- Emblem Logos (Symbols)
- Advance and Complex Logos
Types of Graphic Design?
There are two types of Graphic Design


Victor Graphic Design:
- Victor Graphic (VG) are created by "Math Formula's"
- Benefits of Victor Graphic it is Scalability.
- Quality of design will be Decreased.
- Examples: Logos.
- The Software are Illustrator, Coral
Raster Graphic Design:
- It Done with Pixels.
- Lights and Shades are very clear.
- The Photoshop, InDesign software are used.
What is Photoshop?
Photoshop is a raster graphics editing software developed by Adobe. It is widely used for photo editing, manipulation, and digital art creation.
What is Illustrator?
Adobe Illustrator is Victor graphic editing software. Using for Logos.
What is Shape of Pixel?
The shape of Pixel is four side of corners are same. Like Square and Rectangle. The Rectangle shape pixels used in Films and movie theater.
Rules of Graphic Design:
- Alignment: Edges arrangement is called Alignment. (Left, Right, Top, Bottom, Center)
- Distribution: Whenever doing multiple items then it gives Equal gaps. To apply Distribution min 3 objects will be approved.
- Grids: Thous are predefined Horizontal and Vertical lines.
- Guideline: User Define lines are called Guidelines.
- Rulers: Measurement are called Rulers.
- Snapper: Edge Attractors are called Snappers.


Subscribe to:
Comments (Atom)

-
 G. Bhoomeshwar ( Advocate ) Experienc: 15 Year Phone No: 9441515480 Jagitial District, Raikal ( Mandal), ...
 -
How make a Final Presentation in Adobe illustrator Final Presentation in Adobe illustrator Presentation Process: Open Adobe Illustrator ...
-
Adobe Illustrator is a powerful and widely used vector graphics editor. Here's a breakdown of key information: Purpose: * It's u...

